Node-RED Guide
Never update npm package manager
Updating npm without the official opkg package manager may result in broken dependencies and unstable Node-RED.
Node-RED is a programming tool for wiring together hardware devices, APIs and online services in new and interesting ways. It provides a browser-based editor that makes it easy to wire together flows using the wide range of nodes in the palette that can be deployed to its runtime in a single-click.
If it is your first time using Node-RED, you can check the Node-RED user guide to get familiar with it.
Custom Node-RED
The eManager ships with a custom Node-RED installation. Some customizations include:
- Node-RED is managed as a service by the systemd.
- The eManager path for the Node-RED
settings.jsfile is/etc/node-red/settings.js.
Creating your first flow in Node-RED
You only need to put URL 10.1.10.10:1880 in a browser.
If you do not know the IP of your device, you can access Node-RED as it is explained here.
Then, if you want to create your first flow, you can start from the second step of the following tutorial:
--> Creating your First Flow Tutorial
Learn all the essentials about using the Node-RED editor following this tutorials.
Node-RED palette manager
Thousands of nodes are available in the Palette Manager so you can use Node-RED according to your needs. To manage the nodes, you can follow the following manual:
Installing new nodes can take some minutes.
You can also install Node-RED nodes using the console, as explained here.
Modbus package
The eManager Node-RED incorporates a Modbus TCP and a Serial node package to be able to communicate with most Modbus devices.
If you want to know more about this module, please check the following Modbus package tutorial.
Access security for Node-RED
Step 1. Generate the hash for the password
When it asks for the password, enter the desired password to access the Node-RED.
Step 2. Edit Node-RED configuration file
Add the following content as an option inside module.exports (change the username and password you want):
adminAuth: {
    type: "credentials",
    users: [{
        username: "admin",
        password: "<GENERATED HASH>",
        permissions: "*"
    }]
},
Copy the hash generated in step 2 into <GENERATED HASH>.
Step 3. Restart service
Wait a few seconds for the service to restart and access from a browser in the client connected to eManager.
Watchdog
A watchdog have been incorporated to the Node-RED service to avoid that a service could get stucked when a certain flow is developed.
The watchdog is constantly monitoring Node-RED. If Node-RED does not respond during more than a specific time (2 minutes by default), this service will be restarted automatically.
Node-RED projects
New in image release 22.10.
Node-RED projects are a new feature of Node-RED which simplify redistributing Node-RED applications. Node-RED projects use Git under the hood which endows the Node-RED editor with essential version control tools. These include cloning remote projects or pull/pushing local projects to remote repositories.
Important
Some Git users might find projects feature underpowered. For a more advanced Git experience we recommend using the command-line git tool in an eManager terminal.
Keep in mind that every Node-RED project consists of a git repository placed at /var/lib/node-red/projects.
The following sections describe how to create your first project and how to set a remote GitHub repository. For the second, a GitHub account is necessary.
Step 1. Install Git
Open an eManager terminal with Internet connection and type
Step 2. Enable projects
Edit the settings.js file stored in /etc/node-red/.
Look for the projects block and set the enabled field to true:
// Editor Settings section
    //...
    editorTheme: {
        //...
        projects: {
            //...
            enabled: true,   // set this field to true
            //...
        }
    // ...
    },
Then restart the service
Step 3. Create your first project
Once projects feature is enabled open the Node-RED editor. It should show the following.
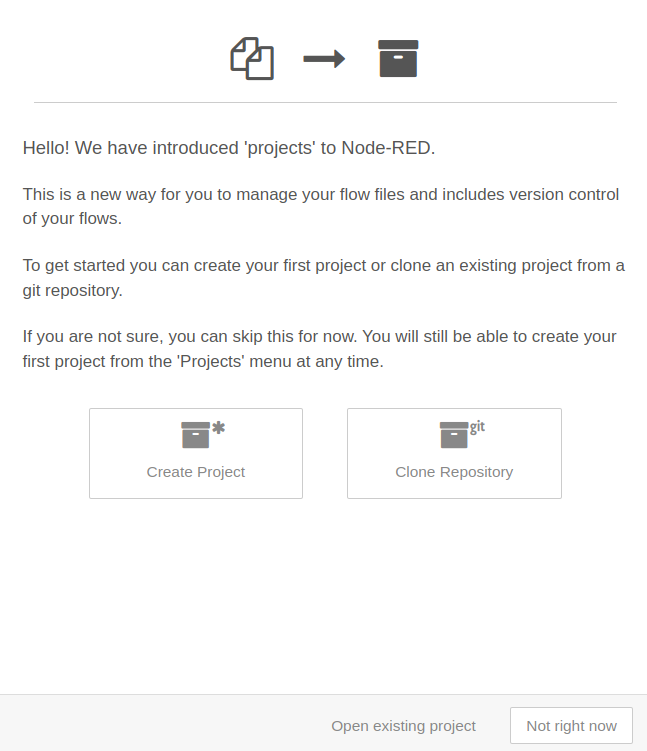
Let's create a new project:
-
Select
Create Project. -
Enter your Github Username and your Github Email and then, press
Next. -
Set a project name and a little description and press
Next. -
Set a name for your flow file and press
Next. -
(Optional) Configure your encryption credentials by using an encryption key.
Note
To encrypt it, you need to choose a key that will be used to secure the file. This key is not stored within the project. If someone else clones your project, you will need to provide them the key to decrypt the credentials file. Otherwise they will need to edit the flow to provide their own credentials.
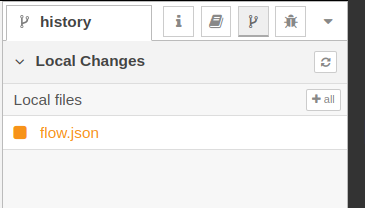
Step 4. Committing project changes
Whenever you change a project file, such as by deploying a new flow configuration, it will be listed in the Local Changes/Local files section. Click the + button in order to stage the files for commit.
Click the commit button and enter a message in order to stage those files.
Congratulations
You have created your first project with local version control. Follow the steps below if you need to use remote repositories like GitHub.
Step 5. Add a remote repository
Once you have a new project created locally, you can configure your remote Git to update this new project into your GitHub.
To do so, go to the Node-RED menu, place the cursor on Projects and click Project Settings. Navigate to Settings and click on add remote.

Name your remote repository (e.g. Remote name: origin) and add the https://github.com/XXX/XXX.git URL of your remote repository in the URL field. Then click Add remote.
Step 6. Configure your Github token
For your local Node-RED to be allowed to interact with the remote repository you need to obtain an authorization (token) from the corresponding GitHub account.
Important
Currently, eManager only supports HTTPS authentification for Node-RED projects. This is explained by an incompatibility between Node-RED 3.0 and our ssh client Dropbear. More on this in Step 8.
To do so, log in into your Github account, go to Settings and select Developer Settings.
Choose Personal access tokens/Tokens (classic) and Generate new token. Set a name for the token, select the expiration day and the scopes of the generated token. Once fulfilled the needed information, select Generate token.
We show how to use the token in Step 7.
Step 7. Pushing to remote
In order to push committed changes into a remote repository, select the Commit History section.
Important
Node-RED will open a dialog requesting credentials while following these steps. The username is your GitHub username and the password is the token generated in Step 6.
Click the Up&Down arrows button and Remote. Create a remote branch if none, e.g. main, then press push. The remote repository in GitHub should contain now some init files together with your flow.json.
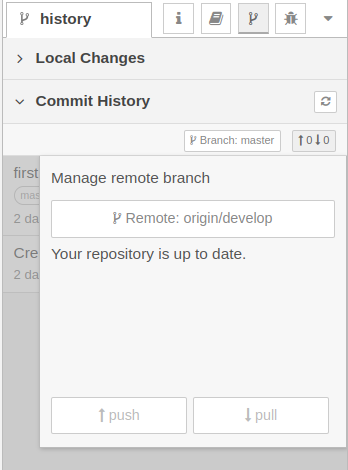
There is also a Branch button to pick the remote/branch to track.
Step 8. (Optional) Switching to SSH
Once we have a Node-RED project with https connection to a GitHub repository, we can use the command line to switch remote URLs from HTTPS to SSH. Read the Git and Dropbear SSH section section for a complete discussion on this topic.